Welcome!

Welcome! :-) Whatever brought you here today wasn't an accident, and I'm so glad you stopped by. I'm always glad to have folks drop in my kitchen for a visit and hope you'll feel right at home. We always have an ample supply of fresh lemonade, sweet tea, and a pot of coffee brewing along with a sideboard full of baked treats for you to enJOY while you're here. Relax and take your time as we visit and catch up on the latest news. Don't forget to email and let me know what's going on in your world, as well. And, come back soon!


Showing posts with label lemonade. Show all posts

Thursday, July 31, 2014

A Pinch of Love, A Smidgen of Joy - EnJOYing a Healthier Summer


Anyone who knew my Mom, creator of this blog and the cookbook "A Pinch of This, A Smidgen of That," knows that she had an affinity for sweets. Of course, being her daughter, I share this same affinity. And this isn't a bad thing! But lately I've been trying to be better with my diet. And when you're trying to eat healthier, you have to alter recipes a bit to suit your diet. Because a little bit of sugar isn't bad, but a lot of it can be, especially when you're like me and tend to overindulge.

I wanted to take a few of my favorite summertime recipes of Momma's and turn them a bit healthier but cutting down on sugar, butter, etc. After all, summer is about living a carefree life in the sunshine and beautiful outdoors - not about feeling icky because we ate something that was a thousand calories. This isn't a "health" post - just a post about a girl trying to find ways of making good food and drinks easier to love, without all the guilt. I promise this won't be a reoccurring post. Just for today, I wish you a healthy, happy summer. :)

I took Momma's recipe for her "Lazy Day Lemonade," and changed it up a bit. See her original recipe on page 10 of the cookbook.


Kenda's "Happy Day Lemon-Limeade"

1/2 cup fresh-squeezed lemon juice (or use bottled lemon juice)
1/2 cup fresh-squeezed lime juice (or use bottled lime juice)
1 teaspoon Stevia Powdered Extract (concentrated) (or 1 cup Sugar in the Raw)
1/2 gallon water (to make simple syrup)
1/2 gallon of cold water
slices of limes and lemons

In a large stockpot on the stove, place 1/2 gallon of water, along with the 1 teaspoon of Stevia Powdered Extract or 1 cup of Sugar in the Raw. Turn heat on high and bring to a boil to create a simple syrup. Boil for a few minutes or until sugar is totally dissolved in the water. Remove pot from heat, and allow to cool on stove top. In a gallon pitcher, pour the freshly-squeezed juices in the pitcher with a 1/2 gallon of cold water and the water-sugar mixture. Stir with long-handle spoon, until well-blended. Serve over ice with slices of limes and lemons. Enjoy on a hot summer day!


Momma has several recipes for banana bread in the cookbook, all of which are amazingly delicious. I wanted one, though, that would be a little lighter to have for breakfast and give me energy of a morning. I prefer having pecans in my bread, but you can omit those if you don't care for them. The recipe I altered is Momma's recipe for "Banana-Walnut Loaf" on page 78 of the cookbook.


Kenda's "Banana-Pecan Breakfast Loaf"

2 cups all-purpose flour
2 1/2 teaspoons baking powder
1/2 teaspoon salt
1/2 cup light brown sugar
1 teaspoon cinnamon
2 eggs
2 ripe bananas, mashed
1/2 cup fat-free milk
1/2 teaspoon vanilla
1 cup pecans, chopped

Preheat oven to 350 degrees. Spray a loaf pan with canola oil. In a large bowl, mix together flour, baking powder, salt, brown sugar and cinnamon. In a separate bowl, mix the eggs with mashed bananas, milk, and vanilla. Add wet mix to the dry, and stir in pecans, just until incorporated well. Pour mixture into loaf pan, and bake for 40-50 minutes, until done in center. Enjoy for breakfast on a nice summer morning!


Saturday, June 30, 2012

Sippin' through a Sizzlin' Summer

As weather forecasters predict triple-digit highs across the country, it's important to protect yourself by staying hydrated. You may be thinking, "Yeah, I know, but I don't like water." Well, here's some good news: You can beat the heat with cool summer drinks, from blended fruit drinks to flavored teas and classic lemonade. I'll share recipes for some of these today along with the traditions and health benefits behind them.

Let's get started with a tall glass of "Switchel"... (bet you never heard of that one!):

Did you ever wonder what folks used to drink in the days before soda pop, and when lemons or limes were out of season? Before Coke and Gatorade, hardworking farmers in colonial days turned to Haymaker's Tea (or Switchel) for refreshment. This was the drink of choice for workers out in the field who wanted to cool off with something with a bit more of a kick than just plain old well water. It was thought that ginger-water would quinch their thirst and not make the workers sick, as plain cold water would, when they tended to drink excessively from being so hot.

Haymaker's Punch was also known as switchel, switzel, swizzle, ginger-water, or switchy. It is a drink made of water mixed with vinegar (yes vinegar), and often seasoned with ginger. Honey, sugar, brown sugar, or maple syrup were sometimes used to sweeten the drink instead of molasses. And, occasionally, oatmeal was added to give it some "body". Switchel originated in the Caribbean, and had become a popular summer drink in the American Colonies in the late 17th century. By the 19th century, it had become a traditional drink to serve to thirsty farmers at hay harvest time, hence the nickname haymaker's punch or haymaker's tea.

I'll include the very simple recipe at the end of this blog, but here's what you need to get started (NOTE: I didn't include the oatmeal. Somehow, I just can't imagine having oatmeal in my drink. But, if you want to add it, please do so, and leave me a comment about your "experience". :-)
As you can see, the ingredients are minimal, simple, and inexpensive, so you've no excuse to avoid trying this thirst-quenching summer drink. A simplified version of switchel may be sweetened in a number of ways--sugar, honey, or maple syrup--but most recipes call for molasses. Here are the specific amounts you'll need:
1/2 cup apple cider vinegar
1/4 to 1/2 cup molasses (I used 1/2 because I love molasses!)
1/2 cup sugar or honey (I used honey, because I love bees! Always wanted to be a bee keeper.)
1 1/2 teaspoons ground ginger
1/2 cup oatmeal (optional) (didn't use this!)
Tap water to make 2 quarts (You'll need to add approximately 6 1/2 cups of water---for a total of 8 cups to make 2 quarts)

You just measure all the ingredients together, to your taste, and mix well with a whisk before diluting with the additional water to total 2 quarts. The taste really improves if you allow the mixture to sit at least 8 hours or overnight before drinking.
Ginger gives this "tea" its zippy bite along with a few healthful benefits, such as improving digestion and reducing blood pressure. Ginger root has medicinal uses as a stomach soother when you have nausea, diarrhea, gas or appetite loss (the good Lord knows that I don't have that problem:-). I really hope you will check out the other health benefits of ginger at this MedLine site: http://www.nlm.nih.gov/medlineplus/druginfo/natural/961.html

Molasses provides additional healthful nutrients said to combat diabetes and weight gain, as well as aid in building muscle strength. Diabetics in particular need to control their blood glucose fluctuations by limiting refined sugars in their diet. Using blackstrap molasses rather than regular molasses adds extra calcium, potassium, iron and B vitamins. No wonder haymakers benefited from this drink! You can learn more about molasses' health benefits here: http://www.ehow.com/facts_4809658_health-benefits-molasses.html

I was surprised that I actually enjoyed the taste of this concoction. If the proportions are done right, it is well balanced and refreshing. The molasses and ginger add the flavour, and the resulting taste reminds me of my favorite organic ginger candy (available at Kroger's organic department): "Ginger Chews." The candy contains diced baby ginger root, raw cane sugar & nothing else, but it is oh so yummy!

According to Reed's the recipe is an ancient one that hasn’t changed much through time. After harvesting baby ginger (the most tender kind), the root is diced and then steeped in large vats filled with simmering raw cane syrup. Steeping for several days, the ginger is then removed and allowed to crystallize into soft, delicious nuggets. Reed’s claims that their Crystallized Ginger is the only one they've found that is sweetened with raw cane instead of white sugar. Here's a sample:
Now, if you didn't care for that refreshing beverage, I'm almost positive you won't turn down my Pineapple Banana Punch. It's one of my favorite drinks to keep in the refrigerator during the summer, and it makes a great punch for showers or a party. One sip of this fruity combo and you'll be whisked away to the tropics. Here's what you'll need to get started:

Combine water and sugar. Boil 5 minutes, cool.

In a LARGE container, add orange juice and lemonade to the sugar water base. Blend and add pineapple juice.

Mash ripe bananas until smooth and creamy (not lumpy):

Add bananas and blend well to mix. 

Pour mixture into 3- 1/2 gallon containers (I used 1-gallon sized Ziploc bags). Freeze and use as the punch base.

To freeze this bagged mixture, I used an oblong plastic container to hold all three bags upright until they were frozen solid, then I removed the container and left the bags in the freezer.

Thaw each container 4 hours before serving. To each 1/2 gallon base add 1- 2-liter 7-up. One base mixed with a 7-up makes 16- 8 oz. servings. (If you forget to thaw the container before serving, pour the soda (7-Up) over the punch in a punch bowl or pitcher and allow to sit for about 15 minutes. Use a skewer or large knife---BE CAREFUL!-- to break apart the frozen mixture until it is slushy and ready to serve.) 

This can also be made all at once and not frozen, but it's best if slushy, in my humble opinion. :-) Dress up the punch with mint or citrus ice cubes. To make decorative cubes, fill the compartments of an ice cube tray with lime, lemon, and/or orange slices (halve or quarter slices to fit). Fill with water or punch. Freeze until firm.


Now, Here is a treasured old recipe that one of my three sisters taught me: Lazy Day Lemonade. ("Lazy" because you don't have to spend all day squeezing lemons to make it!) It's not only EASY, it's refreshing, cold, and delicious. On a hot afternoon my hubby especially enJOYs it while gardening or sitting under a shade tree. You may recall that I included this recipe in a past blog with a Lemon Cheesecake. If you want to read all about lemons and get a bonus cheesecake recipe, you can do so here:
 http://pinchofthissmidgenofthat.blogspot.com/2011/06/summertime-treats-and-staying-cool.html

Here's what you'll need to make the lemonade: In a 1-gallon container, combine 1 1/2 cups Real Lemon lemon juice (or the Kroger or Wal-Mart bottled juices work well, too) along with 2 1/2 cups sugar and 1 large lemon sliced or chunked. Fill the container half-way to the top with cold water. Replace the lid and shake well or stir well to mix (if you don't have a lid :-). Fill all the way to the top with water and mix again. Refrigerate until cold. Serve over ice. (Mix well before pouring into glasses.) EnJOY!
 There’s nothing like that first sip of a chilled drink on a summer day. I pray you've learned some new ways to stay cool and enJOY your time together as a family.
Don't forget to save the recipes below to your recipe files, or print them for future use. Thanks for stopping by!


Switchel (or Haymaker's Tea)
Ingredients:
1/2 cup apple cider vinegar
1/4 to 1/2 cup molasses
1/2 cup sugar or honey
1 1/2 teaspoons ground ginger
1/2 cup oatmeal (optional)
tap water to make 2 quarts

Directions:
First get out a two quart pitcher or a mixing bowl. Measure the vinegar, molasses, sugar or honey and ginger into it. Add cold tap water to bring to two quarts. Stir to dissolve everything and serve in tall ice-filled glasses. Garnish with mint or a lemon wedge. Traditionally, oatmeal was also added to the mixture, to give it a little body, and improve the flavor, but this is certainly optional. This beverage is strongly flavored, nothing bland about it. It tastes best when it has mellowed overnight, blending the ginger with the molasses. It does quench your thirst better than anything else on a hot summer day though, and of course, costs next to nothing to prepare.


Pineapple Banana Punch

Ingredients:
1 12 oz. frozen lemonade, slightly thawed
1 (or two) 12 oz. frozen orange juice, slightly thawed
1 46 oz. canned pineapple juice
2 - 4 cups sugar, (depending on how sweet you want this)
8 cups water
5-6 smashed bananas
3- 2L bottles of 7-Up, Sprite, or Sierra Mist (one bottle for each frozen portion)

Directions:
Combine water and sugar. Boil 5 minutes, cool. Add orange juice and lemonade. Blend and add pineapple juice and bananas. Combine all ingredients and pour into 3 1/2 gallon containers. Freeze and use as the punch base. Thaw each container 4 hours before serving. To each 1/2 gallon base add 1 2-liter 7-up. One base mixed with a 7-up makes 16- 8 oz. servings. (If you forget to thaw the container before serving, pour the soda (7-Up) over the punch in a punch bowl and allow to sit for about 15 minutes. Use a skewer or large knife to break apart the frozen mixture until it is slushy and ready to serve.)

This can also be made all at once and not frozen, but it's best if slushy, in my humble opinion. :-) Dress up the punch with mint or citrus ice cubes. To make decorative cubes, fill the compartments of an ice cube tray with lime, lemon, and/or orange slices (halve or quarter slices to fit). Fill with water or punch. Freeze until firm.


Lazy Day Lemonade


Ingredients:
1 1/2 cups Real Lemon lemon juice (or the Kroger or Wal-Mart version)
2 1/2 cups granulated sugar
1 large beautiful lemon, sliced or chunked
Directions:
In a 1-gallon container, combine lemon juice along with sugar and sliced or chunked lemon. Fill the container half-way to the top with cold water. Replace the lid and shake well or stir well to mix (if you don't have a lid :-). Fill all the way to the top with water and mix well again. Refrigerate until cold. Shake to mix before serving over ice. EnJOY!


Wednesday, June 29, 2011

Summertime Treats and Staying Cool!

Seems like the "Dog Days" of summer have arrived early this year. Sultry, over-90-degree temps, high humidity, stagnant air all make us long for the cooler, crisper air of fall. Until then, we must survive the heat, and what better way to do so than with a tall glass of cold lemonade or a piece of creamy, cool lemon cheesecake?
Lemons always come to mind when I think of a cool summertime dessert. What do you think of when you want something cool and refreshing to eat or drink during hot weather? (Leave your comments below.)

Although lemons are most at home in the kitchen, throughout the centuries, lemons have been used for many nonculinary purposes—as an epilepsy remedy, a toothpaste, an invisible ink and a bleaching agent as well as in witchcraft. Originating in Southeast Asia, the lemon is now cultivated in tropical and temperate climates around the world, with California being the leading producer in the United States. Lemons range in size from that of a large egg to a small grapefruit. Some are thin skined while others have very thick rinds, which are used to make candied lemon peel. Lemons are available year-round with a peak during the summer months. When choosing lemons, pick fruit with smooth, brightly colored skin with no tinge of green (which signals underripeness). Lemons should be firm, plump and heavy for their size. Lemons can be refrigerated in a plastic bag for two to three weeks. The lemon has a multitude of culinary uses for dishes sweet to savory, as well as a flavoring in many drinks. An excellent source of vitamin C (one provides 40 to 70 percent of the minimum daily requirement), the lemon loses 20 percent of vitamin C after only 8 hours at room temperature or 24 hours in the refrigerator. (Source: http://www.foodterms.com/encyclopedia/lemon/index.html)

Lemon juice is available both frozen and bottled but doesn't compare in quality to that of fresh squeezed. Some enJOY it in iced tea; some squeeze it on salads and sprinkle it on fried fish to help cut the grease. You may not realize that lemon juice has many uses besides being a culinary additive. Check out these possibilities:
1. Give Your Hair a Beautiful Shine
Spritzing lemon juice on your hair, then going outside in the sunshine will give you natural-looking highlights. Also, rinsing your hair with lemon juice will make it shiny. The acidic juice will take out shampoo and hair care product residue. For a healthy shine, mix up a 1/4 cup of lemon juice in 1 cup of water.
2. Remove Tarnish From Copper and Brass
Mix up 1/4 cup of table salt and just enough lemon juice to make a paste. Then, apply a coating of this onto any tarnished copper or brass pots, pans and other items you may have. Leave the lemon juice/salt paste set for five to ten minutes. Next, wash the item in warm tap water and then rinse it well. Use a soft, clean cloth to buff it dry. If any tarnish remains, repeat the process again.
3. Use Lemon Juice to Get You Going
Lemon juice is a natural laxative that has no side effects. Just pour 2 tablespoons of fresh lemon juice into an 1 cup of warm water. Drink it in the morning when you first get up. The citrus juice will help regulate your digestive system.
4. Clean Up Household Grease Naturally
Mix up a tough solution of lemon juice and tap water, and your stove, countertops and appliances will be shining like new. Pour a 1/4 cup of lemon juice in a spray bottle, then fill it up with tap water. Shake it a few times to mix the solution, then use it to remove stubborn grease.
5. Disinfect  and Deodorize Your Kitchen Cutting Board
Wash your cutting board in sudsy water, then spray it lightly with pure lemon juice and rinse it well.. Allow the cutting board to dry thoroughly before you put it away, the bacteria- as well as any onion or meat odors and bacteria- should be gone.
6. Remove Sticky Pine Tar From Your Hands
If you've ever worked with fresh pine boughs at Christmas, you know the sticky mess they make. It's almost impossible to get off your hands. Try scrubbing your hands with a mixture of lemon juice and table salt. The pine tar comes right off!
7. Silence a Hacking Cough and Heal a Sore Throat
Mix up 2 teaspoons of lemon juice and 1/2  teaspoon of honey together. Swallow the tasty mixture and you should feel better soon. If needed, repeat the process in thirty minutes.


It's amazing how the lemon can go from a tart, overly tangy, almost bitter fruit to a refreshing dessert when sugar is added. Lemonade is the perfect refreshing summer time drink.


Let's make a tall pitcher of refreshing lemonade, so you can sip on it while we collect our ingredients for today's Lemon Cheesecake.

If you have the cookbook ("A Pinch of This... A Smidgen of That"), you can find my "Lazy Day Lemonade" recipe on page 10. If you don't have the cookbook and would like a copy, see the information below (at the end of this blog) about ordering.

LAZY DAY LEMONADE

In a 1-gallon container, combine 1 1/2 cups Real Lemon lemon juice (or the Kroger or Wal-Mart bottled juices work well, too) along with 2 1/2 cups sugar and 1 large lemon sliced or chunked. Fill the container half-way to the top with cold water. Replace the lid and shake well or stir well to mix (if you don't have a lid :-). Fill all the way to the top with water and mix again. Refrigerate until cold. Serve over ice. (Mix well before pouring into glasses.) EnJOY! :-)


Now that you have something to sip on, let's get started on that Lemon Cheesecake!
Collect your ingredients: (They are listed below along with the complete recipe. This one IS NOT in the cookbook, so be sure to copy and paste it to your word processor and save it or print it out.)

Preheat oven to 325 degrees. Place a shallow pan of water in the lower rack or bottom of your oven. This will add moisture while baking and keep your cheesecake from cracking on top. Be sure to add enough water to keep it from going dry during baking. I usually use a jellyroll pan (like a large deep cookie sheet) and add it as full as I can with water. You'll see a pix of this when I put the cheesecake in the oven. (OOPS! I forgot to take one before I put it in the oven :-).

Spray bottom and side of a 10-inch springform pan with baking spray that includes flour. Or grease well with Crisco solid. (My springform pan came with instructions not to use canned sprays, so I use solid vegetable shortening.)

Don't know if you can see it well enough to read the Doughmakers label on the springform clip (BELOW), but I highly recommend these pans.  Doughmakers produces solid aluminum cookie sheets, pizza pans and specialty cake pans (like springform pans) that have what's called the "Original Pebble Pattern," a unique textured surface which gives Doughmakers pans an easy release. I think they bake more evenly than other pans. (NOTE: I am not being compensated for making this statement. I just happen to like the pans.)

Okay, on with the recipe! Fingers came before spatulas, right? :-) Swab that pan really well with shortening.

Once it's well greased, shake a light coating of flour inside and tap the pan to remove the excess.

It should look something like this (below) when the pan is ready to fill. Normally, when I bake cheesecakes with graham cracker crusts, I do not use the "grease and flour" method. (See the cookbook for "My Favorite Cheesecake" recipe, p. 103... and holler at me if you ever have any questions.) But, since this is using a cake mix base for a crust, I do not want it to stick to the pan.

Reserve 1/4 c. of the cake mix; set aside.
In a large bowl, beat remaining cake mix, butter and lemon peel with mixer on low speed until crumbly.

It should look like this...

 Press in bottom and 1 1/2 inches up side of pan. Set aside until you mix the filling. It is NOT necessary to bake this before pouring in the filling.

Just keep pressing and smoothing, keep smoothing, (you'll feel like "Dori" on "Finding Nemo"!)...

In the same large bowl, beat reserved cake mix, cream cheese, sugar, pudding, sour cream, and eggs on medium speed until smooth and creamy.

Pour over crust.

Bake 80 to 90 minutes or until edges are set but center jiggles slightly when moved. (Notice the pan of water on the rack under the cheesecake.)

Turn off oven and leave cheesecake inside with oven door closed for 2 hours. Remove and cool completely before removing sides of pan.
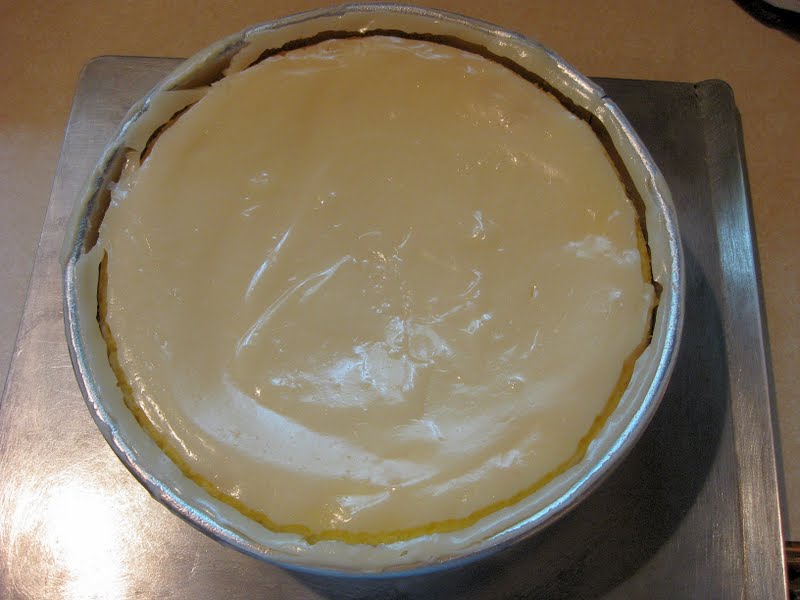
(NOTE: If you choose to top the cheesecake with a sour cream topping (as I did in the photos) instead of piping whipped cream topping around the edges---you COULD do BOTH, if you choose!!---, you will need to add the sour cream mixture as soon as the cheesecake finishes baking (or within the first 30 minutes after it has baked, if you need time for it to settle down a little to give space at the top) and leave it in the 325 degree oven for about 10 minutes BEFORE turning the oven OFF. For SOUR CREAM TOPPING: Mix well 1 - 16 oz. carton sour cream blended with ¾ to 1 Cup sugar and 1/2 tsp. vanilla, 1 tsp lemon flavoring. Spread evenly from the outside rim (touching rim) to the inside middle. Smooth flat on the surface. Return the cheesecake to the oven for a final 10 - 15 minutes to “set” the topping. Turn the oven off and DO NOT OPEN THE DOOR. Allow it to sit for about 2 hours to cool before removing to completely cool at room temperature. Once cool, slide a sharp knife around the rim of the springform pan and open the spring latch to remove (lift straight up for smoother sides).
(Photo below shows cheesecake after sour cream topping was added -- before the additional 10 - 15 minutes of baking time.)

Remove cheesecake from oven; place on cooling rack. After 2 or more hours, without releasing side of pan, run knife around edge of pan to loosen cheesecake. Cool in pan on rack at least another 30 minutes.

Remove sides of pan. Cover loosely; refrigerate at least 4 hours or overnight. Pipe or spoon whipped topping, if desired, around outside edge of cheesecake. Store in refrigerator. 

Here's one I made for Easter Dinner...

Here's a pix of one with whipped cream piped on the top edges...

Are you saying, "YUMMM!" yet?

I hope you and your family are enJOYing your summer together and making some special memories in the kitchen. BLESSINGS to you until next time!


Lemon Cheesecake
Crust 1 box Duncan Hines Classic Yellow OR Lemon Supreme Cake Mix
1/2 c. butter, softened
1 tsp. grated lemon peel

Filling
2 pkgs (8oz. each) Cream Cheese, softened
3/4 c. sugar
3 containers (from 4-pack) (3.5 oz each) lemon pudding (OR, substitute 10.5 oz. from 1 small box Lemon Instant Jello Pudding mix, made according to directions)
1/2 c. sour cream
3 eggs
2 c. Cool Whip whipped topping

Directions
Preheat oven to 325 degrees. Place a shallow pan of water in the lower rack or bottom of your oven. This will add moisture while baking and keep your cheesecake from cracking on top. Be sure to add enough water to keep it from going dry during baking. I usually use a jellyroll pan (like a large deep cookie sheet) and add it as full as I can with water.

Spray bottom and side of a 10-inch springform pan with baking spray that contains flour. Or grease well with Crisco solid and lightly flour, tapping the pan to remove the excess. (My springform pan came with instructions not to use canned sprays, so I use solid vegetable shortening.) Reserve 1/4 c. of the cake mix; set aside. In a large bowl, beat remaining cake mix, butter and lemon peel with mixer on low speed until crumbly. Press in bottom and 1 1/2 inches up side of pan. Set aside until you mix the filling. It is NOT necessary to bake this before pouring in the filling.

In the same large bowl, beat reserved cake mix, cream cheese, sugar, pudding, sour cream, and eggs on medium speed until smooth and creamy. Pour over crust.

Bake 80 to 90 minutes or until edges are set but center jiggles slightly when moved. Turn off oven and leave cheesecake inside with oven door closed for 2 hours. Remove and cool completely before removing sides of pan.

(NOTE: If you choose to top the cheesecake with a sour cream topping (as I did in the photos) instead of piping whipped cream topping around the edges, you will need to add the sour cream mixture as soon as the cheesecake finishes baking (or within the first 30 minutes after it has baked,  if you need time for it to settle down a little to give space at the top) and leave it in the 325 degree oven for about 10 minutes BEFORE turning the oven OFF. For SOUR CREAM TOPPING: Mix well 1 - 16 oz. carton sour cream blended with ¾ to 1 Cup sugar and 1/2 tsp. vanilla, 1 tsp lemon flavoring. Spread evenly from the outside rim (touching rim) to the inside middle. Smooth flat on the surface. Return the cheesecake to the oven for a final  10 - 15 minutes to “set” the topping. Turn the oven off and DO NOT OPEN THE DOOR. Allow it to sit for about 2 hours to cool before removing to cool at room temperature. Once cool, slide a sharp knife around the rim of the springform pan and open the spring latch to remove (lift straight up for smoother sides).

Remove cheesecake from oven; place on cooling rack. After 2 or more hours, without releasing side of pan, run knife around edge of pan to loosen cheesecake. Cool in pan on rack at least another 30 minutes. Remove sides of pan. Cover loosely; refrigerate at least 4 hours or overnight. Pipe or spoon whipped topping, if desired, around outside edge of cheesecake. Store in refrigerator.