Welcome!

Welcome! :-) Whatever brought you here today wasn't an accident, and I'm so glad you stopped by. I'm always glad to have folks drop in my kitchen for a visit and hope you'll feel right at home. We always have an ample supply of fresh lemonade, sweet tea, and a pot of coffee brewing along with a sideboard full of baked treats for you to enJOY while you're here. Relax and take your time as we visit and catch up on the latest news. Don't forget to email and let me know what's going on in your world, as well. And, come back soon!


Showing posts with label Breakfast. Show all posts

Thursday, July 31, 2014

A Pinch of Love, A Smidgen of Joy - EnJOYing a Healthier Summer


Anyone who knew my Mom, creator of this blog and the cookbook "A Pinch of This, A Smidgen of That," knows that she had an affinity for sweets. Of course, being her daughter, I share this same affinity. And this isn't a bad thing! But lately I've been trying to be better with my diet. And when you're trying to eat healthier, you have to alter recipes a bit to suit your diet. Because a little bit of sugar isn't bad, but a lot of it can be, especially when you're like me and tend to overindulge.

I wanted to take a few of my favorite summertime recipes of Momma's and turn them a bit healthier but cutting down on sugar, butter, etc. After all, summer is about living a carefree life in the sunshine and beautiful outdoors - not about feeling icky because we ate something that was a thousand calories. This isn't a "health" post - just a post about a girl trying to find ways of making good food and drinks easier to love, without all the guilt. I promise this won't be a reoccurring post. Just for today, I wish you a healthy, happy summer. :)

I took Momma's recipe for her "Lazy Day Lemonade," and changed it up a bit. See her original recipe on page 10 of the cookbook.


Kenda's "Happy Day Lemon-Limeade"

1/2 cup fresh-squeezed lemon juice (or use bottled lemon juice)
1/2 cup fresh-squeezed lime juice (or use bottled lime juice)
1 teaspoon Stevia Powdered Extract (concentrated) (or 1 cup Sugar in the Raw)
1/2 gallon water (to make simple syrup)
1/2 gallon of cold water
slices of limes and lemons

In a large stockpot on the stove, place 1/2 gallon of water, along with the 1 teaspoon of Stevia Powdered Extract or 1 cup of Sugar in the Raw. Turn heat on high and bring to a boil to create a simple syrup. Boil for a few minutes or until sugar is totally dissolved in the water. Remove pot from heat, and allow to cool on stove top. In a gallon pitcher, pour the freshly-squeezed juices in the pitcher with a 1/2 gallon of cold water and the water-sugar mixture. Stir with long-handle spoon, until well-blended. Serve over ice with slices of limes and lemons. Enjoy on a hot summer day!


Momma has several recipes for banana bread in the cookbook, all of which are amazingly delicious. I wanted one, though, that would be a little lighter to have for breakfast and give me energy of a morning. I prefer having pecans in my bread, but you can omit those if you don't care for them. The recipe I altered is Momma's recipe for "Banana-Walnut Loaf" on page 78 of the cookbook.


Kenda's "Banana-Pecan Breakfast Loaf"

2 cups all-purpose flour
2 1/2 teaspoons baking powder
1/2 teaspoon salt
1/2 cup light brown sugar
1 teaspoon cinnamon
2 eggs
2 ripe bananas, mashed
1/2 cup fat-free milk
1/2 teaspoon vanilla
1 cup pecans, chopped

Preheat oven to 350 degrees. Spray a loaf pan with canola oil. In a large bowl, mix together flour, baking powder, salt, brown sugar and cinnamon. In a separate bowl, mix the eggs with mashed bananas, milk, and vanilla. Add wet mix to the dry, and stir in pecans, just until incorporated well. Pour mixture into loaf pan, and bake for 40-50 minutes, until done in center. Enjoy for breakfast on a nice summer morning!


Friday, February 22, 2013

Top 'O the Mornin' to Ya'

“Top of the morning to you”, or more casually “Top o’ the mornin’ to ya”, is a well-known traditional Irish greeting that Irish people don’t really use anymore, but I think we should. Beginning the day in a positive spirit and sharing that spirit with those around us can make all of us enJOY better days.

One way to start the day off right is with a yummy breakfast. Your mother was right: Breakfast really is the most important meal of the day. Not only does it give you energy to start a new day, but breakfast is linked to many health benefits.

Eating breakfast is important for everyone, but is especially so for children and adolescents. According to the American Dietetic Association, children who eat breakfast perform better in the classroom and on the playground, with better concentration, problem-solving skills, and eye-hand coordination. Even if you think you don’t have time to eat breakfast, biscuits with a piece of ham or egg tucked inside provide grab-and-go options that fill the bill.

Our grandson, Samuel, loves hot biscuits with gravy for breakfast. He also enJOYs biscuits stuffed with ham and cheese. When he spends the night, I make sure we have plenty of biscuits for him to enJOY, however he chooses to eat them. Seems like he always wakes up extra hungry after a good night's sleep.

Biscuits are great topped with plain white gravy or chocolate gravy. (Have you ever eaten Chocolate Gravy? If not, check out the recipe on page 94 of "A Pinch of This ... A Smidgen of That" cookbook.) My husband likes sausage gravy and biscuits, but I think his favorite biscuit topping is butter and either homemade blackberry jelly or peach jam. I try to keep a good supply of both on hand.
When I was growing up, I remember my momma making homemade buttermilk biscuits every morning for breakfast. They were soooooooo good! I only wish I'd paid more attention to her method of making those biscuits. Unfortunately, by the time I was old enough to want to learn how to make them, she had passed away. (You can learn from my mistakes! Ask your momma NOW to show you her kitchen secrets before it's too late!) I've tried dozens of biscuit recipes over the almost 40 years I've been married, and none compare to my momma's fluffy, delicious, high-rise biscuits. But, I'm still trying ... and always learning!

The recipe I want to share with you today still can't compete with my momma's, but it's pretty close. I still have a few "tweaks" I want to try with it, but I didn't want to wait until then to share this great biscuit recipe with you. I can tell you, these are delicious fresh and hot from the oven -- crispy on the outside and tender and fluffy inside -- and they are equally as good when they are a day old, if you wrap them in a paper towel and microwave them for a few seconds. I just bag up the leftovers from breakfast on Saturday morning, and we enJOY them with ham and cheese or other accompaniments during the week. It's a quick, but nourishing, treat with a hot cup of coffee. And, it makes you want to say, "Top 'o the mornin' to ya'", I promise!

So, let's get started and make a nice batch of yummy biscuits. Go gather your ingredients and "mise en place" (pronounced: miz on plas). My daughter tells me this is French for "putting in place". (Whatever it is, I know it sure helps avoid some messes in the kitchen if your ingredients are organized and ready to grab when you need them!)
Here's what you'll need:
First, you need to preheat the oven to 450 degrees F. (It's important the biscuits go directly into the hot oven.) Lightly grease a cookie sheet or biscuit pan. I like to use air-bake cookie sheets.
Use a wisk to blend flour, salt, cream of tartar, sugar, and baking powder.
   
If you're really energetic, you could sift this mixture, but I think it turns out fine just to use a whisk.
Use a pastry cutter to incorporate butter (cut into small cubes) into the flour mixture.
Lightly beat egg in milk before stirring it in the flour mixture.
Add the egg and milk mixture all at once. Work quickly, using a spatula to combine.
Mix only long enough for most of the flour to be taken up. DO NOT KNEAD. Flour a work space and turn the lump of dough out onto the counter. You may have a bit of flour in the bottom of the bowl when you turn it out onto the floured countertop, but it will work in as you press the dough down and roll it out.
Knead only a couple of times to get the rest of the flour worked in. Don’t ever-knead the dough as you would yeast bread. The dough should appear floury on the outside and sticky on the inside. Using your fingers and palm, press the dough down and use a dough roller to flatten to half-inch thickness.
Cut to desired size (mine were about 2 1/2 inch diameter) 
and place on a lightly greased baking-sheet (I like the air-bake sheets). I can get about 15 to 20 medium-sized biscuits out of this dough. You might get more or less, depending on the size of the cutter you use.
Bake for 10 - 12 minutes, or until they reach desired golden brown. I rarely use a timer; I just pull them out when I like how they look. You might start checking them at about 10 minutes (just look through the glass door---if your oven has one---don't open it until you think they are done). Allow them to go a little longer, depending on the degree of browning you desire.
When hot out of the oven, these biscuits are flaky in the outside and moist in the inside (and oh soooo good slathered with a pat of butter and some jam or jelly).
They will soften a bit on the outside after they cool, but they hold together well and remain delicious as leftovers. Store leftovers in a plastic bag. To warm, wrap desired amount of biscuits in a paper towel and microwave about 15 seconds.
EnJOY!
Don't forget to save the recipe below in your recipe file! Leave me a comment and let me know how yours turns out and what you used to top them. (Hint: Sorghum molasses just makes these better and better!)
 
 
HIGH-RISE BISCUITS

INGREDIENTS:
3 cups of all purpose flour (you may substitute a cup of whole wheat, if you prefer)
1/2 teaspoon salt
3/4 teaspoon cream of tartar
2 tablespoons sugar
4 teaspoons baking powder
3/4 cup of butter.
1 egg
1 cup of milk (I used 2%, but I want to try buttermilk to see how it turns out. I'll let you know!)

DIRECTIONS

Preheat the oven to 450 degrees F. (It's important the biscuits go directly into the hot oven.) Lightly grease a cookie sheet or biscuit pan. I like to use air-bake cookie sheets.
 
Use a whisk to blend flour, salt, cream of tartar, sugar, and baking powder. Use a pastry cutter to incorporate butter (cut into small cubes) into the flour mixture.

Lightly beat egg in milk before stirring it in the flour mixture. Work quickly, using a spatula to combine. You may have a bit of flour in the bottom of the bowl when you turn it out onto the floured countertop, but it will work in as you press the dough down and roll it out. Knead only a couple of times to get the rest of the flour worked in. Don’t ever-knead the dough as you would yeast bread. The dough should appear floury on the outside and sticky on the inside.

Using your fingers and palm, press the dough down and roll to half-inch thickness. Cut to desired size and place on a lightly greased baking-sheet (I like the air-bake sheets). Bake for 10 - 12 minutes, or until they reach desired golden brown. I rarely use a timer; I just pull them out when I like how they look. I can get about 15 to 20 medium-sized biscuits out of this dough. You might get more or less, depending on the size of the cutter you use.

When hot out of the oven, these biscuits are flaky in the outside and moist in the inside. Store leftovers in a plastic bag and microwave to warm. (They will soften a bit on the outside after they cool, but they hold together well and remain delicious as leftovers.)
With St. Patrick's Day coming up in a couple of weeks, I've been thinking a lot about  my Irish heritage. Food was often scarce for the Irish in olden times. The biscuits we shared in today's recipe would have been a special treat to many. Famines had ravaged potato harvests and driven Irish immigrants to America to escape the hardships. One result of experiencing hard times is that we often become even more thankful for God's blessings and even more willing to tell Him so. Mealtimes are appropriate times to acknowledge and ask for God's continued blessings on our homes and families.

Irish blessings have been handed down through the ages to enrich many occasions. Irish prayers are suitable for all the family and instill a sense of deep belonging. You would be touched by Irish blessings said prior to meals that are generally blessings to give thanks and gratitude for food that was often hard to come by. Irish blessings before meals often give thanks for the abundance at the table, since poverty was prevalent among the Irish population. Here is one such prayer: “May the blessings of each day be the blessings you need most.”
 
You may have heard these Irish blessings repeated during a St. Patrick's Day celebration: “May good luck be your friend in whatever you do, and may trouble be always a stranger to you.”
 
Always appropriate and welcomed by all is this blessing:
“May this luck of the Irish be always at hand,
and good friends always near you.
May each and every coming day,
bring some special JOY to cheer you.”
 
Don't forget to give THANKS for your "daily bread", even if it is only biscuits!
 

Monday, January 28, 2013

Super Seats, Super Eats, Super Party

When Super Bowl XLVII, the biggest game in American sports, kicks off on February 3, 2013, what will you serve your football enthusiasts? If you can't be at the Superdome, the next best thing is relaxing at home with friends and family as you enJOY watching the San Francisco 49ers battle it out with the Baltimore Ravens. As important as the game may be to fans, just as important are the snacks you'll serve.
 
Whether your team wins or not, if you want to be a winning host/hostess, plan some great finger foods like these Sausage Stars. They are easy to prepare and always appreciated as a great savory snack.

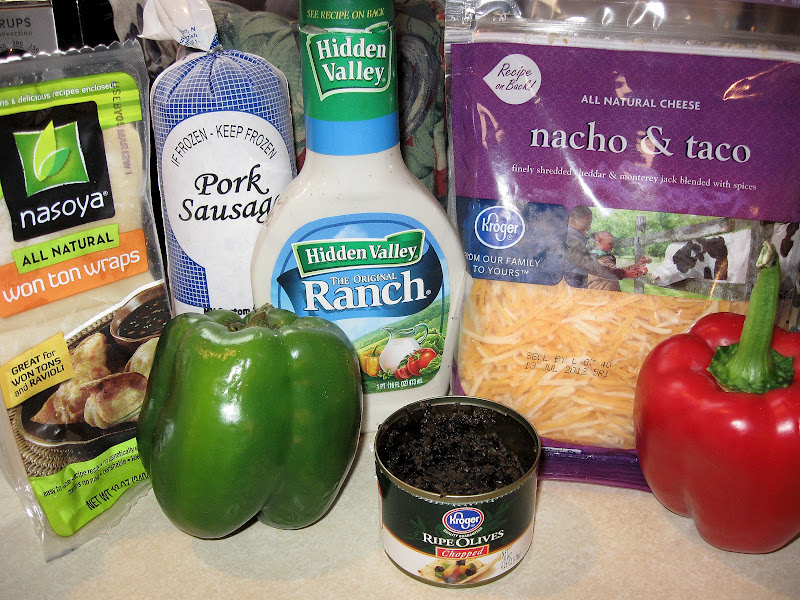
Let's get started by collecting our ingredients...
FILLING PREPARATION:
Cook sausage and blot dry with paper towels.
I usually line a large mixing bowl with paper towels and use them to squeeze out whatever excess grease I can from the browned sausage. Then, while the sausage cools, I chop the veggies.
Combine chopped peppers and olives with sausage.
Add Ranch dressing.

Stir to combine and add cheeses.
(NOTE: This mixture can be made the night before and stored in the refrigerator. This is usually what I do. Then, it only takes 5 minutes after the stars are filled for them to bake at 350 degrees and be ready to eat.)
If you store in the refrigerator for later use, cover and then remove when ready to fill baked wonton shells.

STAR PREPARATION:
When ready to prepare stars, preheat oven to 350 degrees. QUICKLY, separate and arrange single won ton wrappers in muffin tins (DO NOT spray or coat pans with shortening) so they form “stars.” These will stand up and bake better if you keep them COLD until ready to place in the tins. Handle them as little as possible to keep from warming them as you arrange the “star.”

Bake only 5 minutes until the “raw” look disappears. They may turn a little “golden” on the tips, but should not brown. You just want them to firm up so they hold the filling. After removing from the oven, you can leave these shells in the tins and fill them to bake immediately. Or, you can remove the empty shells from tins and place on baking sheet and set aside for filling later, after you have finished baking all the shells. (Shells can be baked a few hours or the night before and covered with wrap, ready to be filled the next morning.)
Use a teaspoon to fill prepared stars with sausage mixture. Place back on the baking sheet.
Bake 5 minutes until bubbly and cheese is melted. Makes about 50 yummmmmy stars.
HINTS FOR LEFTOVERS:
Leftovers can be stored covered in the refrigerator and warmed in a toaster oven or microwave for a quick snack. Toaster ovens work nicely, since they keep the crusts more crisp.

Sometimes, depending on how full I prepare the “stars,” I may have some leftover filling. If so, my hubby likes to split a breakfast biscuit (already baked) and top it with the filling, then toast it in the toaster oven for a quick breakfast snack. I have also spread the filling on Pillsbury crescent roll dough before rolling them up to bake. (YUMMY and QUICK appetizer!)

The Super Bowl is the second-largest food consumption holiday of the year, according to the USDA, behind Thanksgiving and ahead of Christmas Day. Make this the best Super Bowl ever and be a STAR in the kitchen by serving these great snacks! Don't forget to print the recipe or copy and paste it to a file you can store on your computer.
Pat’s Sausage Stars

Ingredients:
2 c. (1 lb.) sausage cooked, crumbled & blotted well with paper towels
1 1/2 c. sharp Cheddar cheese, grated
1 1/2 c. Monterey Jack cheese, grated
1 1/2 c. bottled Ranch dressing (sometimes I use the Lite version)
1 - 4 oz. can chopped ripe black olives, drained
1/2 c. red or green (I occasionally mix these) bell peppers, chopped small
1 pkg. Of 50 fresh won ton wrappers (keep COLD until ready to bake!)

FILLING PREPARATION:
Cook sausage and blot dry with paper towels. Combine with Ranch dressing, olives and peppers. Stir to combine and when cooled, add cheeses. (NOTE: This mixture can be made the night before and stored in the refrigerator. This is usually what I do. Then, it only takes 5 minutes after the stars are filled for them to bake at 350 degrees and be ready to eat.) Use a teaspoon to fill prepared stars (see below for preparation) with sausage mixture. Place back on the baking sheet. Bake 5 minutes until bubbly and cheese is melted. Makes about 50 yummmmmy stars.
STAR PREPARATION:
When ready to prepare stars, preheat oven to 350 degrees. QUICKLY, separate and arrange single won ton wrappers in muffin tins (DO NOT spray or coat with shortening) so they form “stars.” These will stand up and bake better if you keep them COLD until ready to place in the tins. Handle them as little as possible to keep from warming them as you arrange the “star.” Bake only 5 minutes until the “raw” look disappears. They may turn a little “golden” on the tips, but should not brown. You just want them to firm up so they hold the filling. You can leave these in the tins and fill them to bake, if only making a few, but if you need to make more “stars” and need to reuse the tins, remove the empty shells from tins and place on baking sheet and set aside for filling later. (These can be baked a few hours or the night before and covered with wrap, ready to be filled the next morning.)

HINTS FOR LEFTOVERS:
Leftovers can be stored covered in the refrigerator and warmed in a toaster oven or microwave for a quick snack. Toaster ovens work nicely, since they keep the crusts more crisp.

Sometimes, depending on how full I prepare the “stars,” I may have some leftover filling. If so, Ken likes to split a breakfast biscuit (already baked) and top it with the filling, then toast it in the toaster oven for a quick breakfast snack. I have also spread the filling on Pillsbury crescent roll dough before rolling them up to bake. (YUMMY and QUICK appetizer!)