If you know me personally, and especially if you've known me very long, you know one of my passions is star gazing ... and no, I don't mean astrology. I love the study of astronomy and am constantly amazed at the precision and glory God placed in the Universe for us to enJOY. One of my favorite Bible verses is Jeremiah 32:17, "Ahh! Lord God! Behold, Thou hast made the heavens and the earth by Thy great power and outstretched arm. Nothing is too difficult for Thee." I am assured each time I look up at the night sky that God is truly in control, and if He can manage such a magnificient universe, He can surely take care of my loved ones and me. Not only can He take care of us, but He loves us beyond comprehension.
One of our greatest needs as human beings is to be loved. We all need love. We need to know that we are important to somebody, that somebody truly cares about us, wants us, and accepts us unconditionally. Knowing the God of love and experiencing the depths of His love helps us grow to be more loving and giving persons. The Bible says in 1 John 4:8, "The person who does not love does not know God, because God is love," and in 1 John 4:16, "And we have come to know and to believe the love that God has in us. God is love, and the one who resides in love resides in God, and God resides in him."
Getting to know the One who created and maintains the Universe enables us to rest assured that He loves us and takes care of us. The more we're assured of His love and care, the less demands we'll make of others and the freer we'll be to reach out unselfishly as we minister to them for their benefit alone.
Most of us usually hesitate to do anything for others that will cost us too much or inconvenience us too greatly. But God’s love cost Him the very best that He had—His only Son. That is the message of the greatest love text in the Bible: “For God so loved the world, that He gave His only begotten Son, that whoever believes in Him should not perish, but have eternal life” (John 3:16). Although Jesus possessed the power to walk away from the cross unscathed, He voluntarily stayed and bore the suffering we deserved. There simply is no greater love (John 15:13, "No one has greater love than this – that one lays down his life for his friends.").
This month, as we celebrate St. Valentine's Day (February 14), we remember one or more (possibly 14 in all) of God's servants named St. Valentine who, as martyrs, knew the cost of sacrifice. Traditionally, on Valentine's Day, we express our care for each other by presenting gifts of flowers, candies and confections, or by sending greeting cards ("valentines"). Modern Valentine's Day symbols include heart shapes, doves, and winged Cupid figures. Since the 19th century, homemade and handwritten valentines have evolved to mass-produced (and sometimes more expensive) greeting cards. (To learn more about the history of Valentine's Day and those thought to be St. Valentine, see: http://en.wikipedia.org/wiki/Saint_Valentine.)
Do you like to be told you are loved? George Eliot said, "I like not only to be loved, but to be told I am loved". As you celebrate during this "month of love," I challenge you to remember first the One who loves you most and made the ultimate sacrifice for you. Tell Him how much you love Him. Then, let Him inspire you to love others sacrificially through your words and acts of kindness.
Giving the gift of food is an appropriate way to say, "I love you," even on Valentine's Day, when candy and flowers traditionally dominate. Think of your loved ones' favorite menu items or special treats and create something just for them. Cook a special dinner and set the table with candles and your best dinnerware and napkins. Let your family know how special they are.
When my daughter from Savannah visits us, one of her favorite savory brunch items is Sausage Stars (photo below).
I used to make these for my daughter and her group of friends when they were teenagers. Even now, when I make them for her, it's still my way of saying, "I love you and hold special memories of you and your friends in my heart." Today, I want to share my recipe for Sausage Stars with you, and I hope they become a loving tradition with your family and friends, as well.
As much as I enJOY savory items like Sausage Stars (which are a big hit on Super Bowl Sunday), I have to admit that it's the sweet treats that come to mind for Valentine's Day. So, I also want to introduce you to a new "gadget" that I just received and have enJOYed using to make heart-shaped mini-pies. It's Wilton's Mini-Pie Press. (See photo below.) You can purchase these at the Wilton site (and I don't get a single thing except JOY for sharing that information!): http://www.wilton.com/store/site/product.cfm?id=03814E7F-AF5F-3FED-9BE421AE29D1F3A4&fid=05E78BD3-C6F6-1ED2-CE9CC3A2BB822EA2

Now, let's get cooking!
FILLING PREPARATION:
Cook sausage and blot dry with paper towels.
I usually line a large mixing bowl with paper towels and use them to squeeze out whatever excess grease I can from the browned sausage. Then, while the sausage cools, I chop the veggies.
Combine chopped peppers and olives with sausage.
Add Ranch dressing.
Stir to combine and add cheeses.
(NOTE: This mixture can be made the night before and stored in the refrigerator. This is usually what I do. Then, it only takes 5 minutes after the stars are filled for them to bake at 350 degrees and be ready to eat.)
If you store in the refrigerator for later use, cover and then remove when ready to fill baked wonton shells.
STAR PREPARATION:
When ready to prepare stars, preheat oven to 350 degrees. QUICKLY, separate and arrange single won ton wrappers in muffin tins (DO NOT spray or coat pans with shortening) so they form “stars.” These will stand up and bake better if you keep them COLD until ready to place in the tins. Handle them as little as possible to keep from warming them as you arrange the “star.”
Bake only 5 minutes until the “raw” look disappears. They may turn a little “golden” on the tips, but should not brown. You just want them to firm up so they hold the filling. After removing from the oven, you can leave these shells in the tins and fill them to bake immediately. Or, you can remove the empty shells from tins and place on baking sheet and set aside for filling later, after you have finished baking all the shells. (Shells can be baked a few hours or the night before and covered with wrap, ready to be filled the next morning.)
Use a teaspoon to fill prepared stars with sausage mixture. Place back on the baking sheet.
Bake 5 minutes until bubbly and cheese is melted. Makes about 50 yummmmmy stars.
HINTS FOR LEFTOVERS:
Leftovers can be stored covered in the refrigerator and warmed in a toaster oven or microwave for a quick snack. Toaster ovens work nicely, since they keep the crusts more crisp.
Sometimes, depending on how full I prepare the “stars,” I may have some leftover filling. If so, my hubby likes to split a breakfast biscuit (already baked) and top it with the filling, then toast it in the toaster oven for a quick breakfast snack. I have also spread the filling on Pillsbury crescent roll dough before rolling them up to bake. (YUMMY and QUICK appetizer!)
Pat’s Sausage Stars
Ingredients:
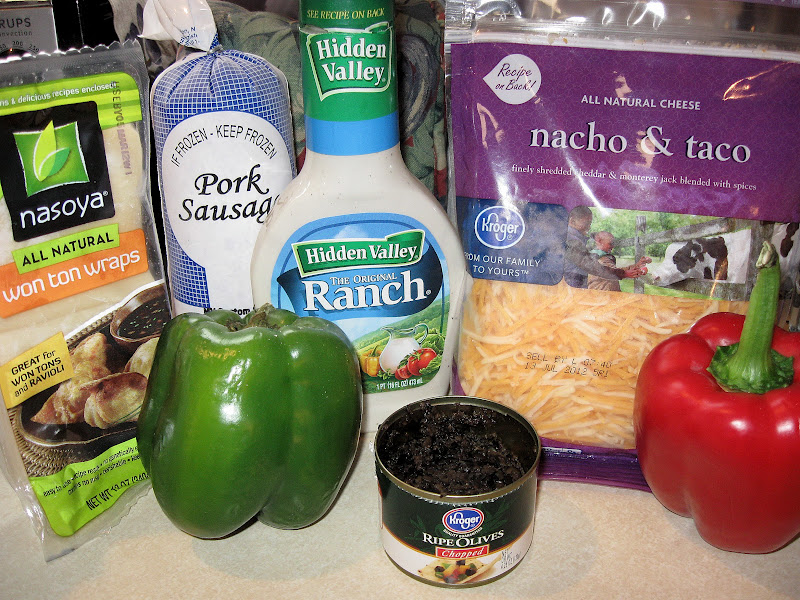
2 c. (1 lb.) sausage cooked, crumbled & blotted well with paper towels
1 1/2 c. sharp Cheddar cheese, grated
1 1/2 c. Monterey Jack cheese, grated
1 1/2 c. bottled Ranch dressing (sometimes I use the Lite version)
1 - 4 oz. can chopped ripe black olives, drained
1/2 c. red or green (I occasionally mix these) bell peppers, chopped small
1 pkg. Of 50 fresh won ton wrappers (keep COLD until ready to bake!)
FILLING PREPARATION:
Cook sausage and blot dry with paper towels. Combine with Ranch dressing, olives and peppers. Stir to combine and when cooled, add cheeses. (NOTE: This mixture can be made the night before and stored in the refrigerator. This is usually what I do. Then, it only takes 5 minutes after the stars are filled for them to bake at 350 degrees and be ready to eat.) Use a teaspoon to fill prepared stars (see below for preparation) with sausage mixture. Place back on the baking sheet. Bake 5 minutes until bubbly and cheese is melted. Makes about 50 yummmmmy stars.
STAR PREPARATION:
When ready to prepare stars, preheat oven to 350 degrees. QUICKLY, separate and arrange single won ton wrappers in muffin tins (DO NOT spray or coat with shortening) so they form “stars.” These will stand up and bake better if you keep them COLD until ready to place in the tins. Handle them as little as possible to keep from warming them as you arrange the “star.” Bake only 5 minutes until the “raw” look disappears. They may turn a little “golden” on the tips, but should not brown. You just want them to firm up so they hold the filling. You can leave these in the tins and fill them to bake, if only making a few, but if you need to make more “stars” and need to reuse the tins, remove the empty shells from tins and place on baking sheet and set aside for filling later. (These can be baked a few hours or the night before and covered with wrap, ready to be filled the next morning.)
HINTS FOR LEFTOVERS:
Leftovers can be stored covered in the refrigerator and warmed in a toaster oven or microwave for a quick snack. Toaster ovens work nicely, since they keep the crusts more crisp.
Sometimes, depending on how full I prepare the “stars,” I may have some leftover filling. If so, Ken likes to split a breakfast biscuit (already baked) and top it with the filling, then toast it in the toaster oven for a quick breakfast snack. I have also spread the filling on Pillsbury crescent roll dough before rolling them up to bake. (YUMMY and QUICK appetizer!)
Now, how about some Mini-Pie Hearts for your Sweetheart? ... Here's what you'll need:
On the day I made these, I had several projects going and wanted to save some steps, so I used pre-made refrigerated pie dough. The Wilton Pie Press functions as a cutter and press all in one. You use the outer edge to cut hearts into the dough. If you use the box of refrigerated dough (2 sheets per box), each sheet will fit about 5 hearts depending on how close you squeeze them. If you combine and re-roll the scrap dough from both sheets and cut again, you get an extra two hearts, so two sheets will produce 12 hearts or 6 pies total. Is that as clear as mud? :-) Just email me if you have a question!
Roll your dough flat and even, just as you would for any other one or two-crust pie. Use the bottom of the pie press or a 4 to 5-inch heart-shaped cookie cutter as a pattern.
Use fingers to fit the dough into one side of the mold. (Press gently! You don't want it to stick.) (See NOTE below concerning the cookie cutter method.) Place a second piece of dough in the other side of the press. (The crimped pattern forms the top and the flat rim is the bottom once the pie is baked. Well, duh! I'm pretty sure you could have figure that out for yourself!) Brush dough edges with egg wash. Top one of the sides with 2 tablespoons of filling to within 1/2 in. of edges.
Close press to crimp edges and seal pie. Remove mini-pie from press and bake or fry. (If you choose to bake, you will need to beat one egg white until foamy and gently bush a small amount on top of each crust. This helps with browning. If you do not plan to use icing on top, you can sprinkle granulated sugar on the wet egg washed crust, if desired.)
To Bake: Preheat oven to 375° - 400°F (My oven gets very hot, so I used 375°F.) Place pies on a large cookie sheet and bake 18-20 minutes or until golden. Remove and allow to cool on the cookie sheet. Once the pies have cooled, you can add a confectioners' glaze on top and decorate them with holiday themed candy decorations.
I chose not to sprinkle sugar on the tops, because I planned to drizzle confectioners' icing over them after they cooled. Also, I forgot to use a fork to poke holes before I baked (to keep them from cracking), so mine leaked just a little, but they were still very yummy! I don't think you can ruin these no matter what you do wrong! :-) The photo below was made before drizzling with icing.
Here's an "after" pix:
And this pretty version came from Wilton's blog site: A Piece of Cake--Ideas from Wilton
I hope you've enJOYed getting to visit and learn some new recipes that can be used any time of the year, not just for Valentine's Day. Be sure to print and save the recipes before you go. And, I'd love it if you left a comment about what special treats or plans you have in mind for your loved ones this Valentine's Day.
Mini-Pie Hearts
What You Will Need:
2 – Refrigerated Pie Crust Dough Rolls
1 – can cherry pie filling
1 – egg white, beaten
1 – cup powdered sugar
2 tablespoons milk
red food coloring, decorations (optional)
If you prefer homemade crust, you can find a great recipe for Flaky Pie Crust here: http://www.pinchofthissmidgenofthat.blogspot.com/search/label/Pie%20crust. On the day I made these, I had several projects going and wanted to save some steps, so I used pre-made refrigerated pie dough. The Wilton Pie Press is functions as a cutter and press all in one. You use the outer edge to cut hearts into the dough. If you use the box of refrigerated dough (2 sheets per box), each sheet will fit about 5 hearts depending on how close you squeeze them. If you re-roll the dough and cut again, two sheets will produce 12 hearts or 6 pies total.
1. Roll your dough flat and even, just as you would for any other one or two-crust pie. Use the bottom of the pie press or a 4 to 5-inch heart-shaped cookie cutter as a pattern. Use fingers and fit the dough into one side of the mold. (See NOTE below concerning the cookie cutter method.)
2. Place a second piece of dough in the other side of the press. (The crimped pattern forms the top and the flat rim is the bottom.) Brush dough edges with egg wash.
3. Top one of the sides with 2 tablespoons of filling to within 1/2 in. of edges.
4. Close press to crimp edges and seal pie.
5. Remove mini-pie from press and bake or fry. (If you choose to bake, you will need to beat one egg white until foamy and gently bush a small amount on top of each crust. This helps with browning. If you do not plan to use icing on top, you can sprinkle granulated sugar on the wet egg washed crust, if desired.)
To Bake: Preheat oven to 375° - 400°F (My oven gets very hot, so I used 375°F.) Place pies on a large cookie sheet and bake 18-20 minutes or until golden. Remove and allow to cool on the cookie sheet. Once the pies have cooled, you can add a confectioners' glaze on top and decorate them with holiday themed candy decorations.
For Frying: Fill a deep skillet or wide saucepan with 2 inches vegetable oil. Heat to 375°F on a deep frying thermometer. Fry pies in batches (of two) for about 2-4 minutes (turning once half-way through) or until crust is golden. Drain on paper towels. Decorate, if desired.
I've found that these little dough presses (I have another that's half-moon-shaped) are great for more than sweets! It’s easy to make savory pocket pies—using meats or veggies! I have a new recipe for Spinach and Cheese Empanadas that I want to share with you soon (as soon as I can photograph it!) These delicious empanadas are filled with sautéed garlic spinach and a creamy cheese sauce. They are a special treat your family is sure to enJOY!
COOKIE CUTTER METHOD:
If you don't have a heart-shaped dough press, like the one in the photo, simply roll out the dough, and cut 2 hearts with a 4-5 inch cookie cutter. Brush the edges of one heart lightly with water or egg wash. Place 2 tablespoons filling in the center of the heart, then cover with the other heart-shaped piece of dough. Press edges together firmly, then roll edges inward, making a decorative twisted rope effect around the edge of the heart. Brush with egg wash and bake.